
Table of Contents
Introduction
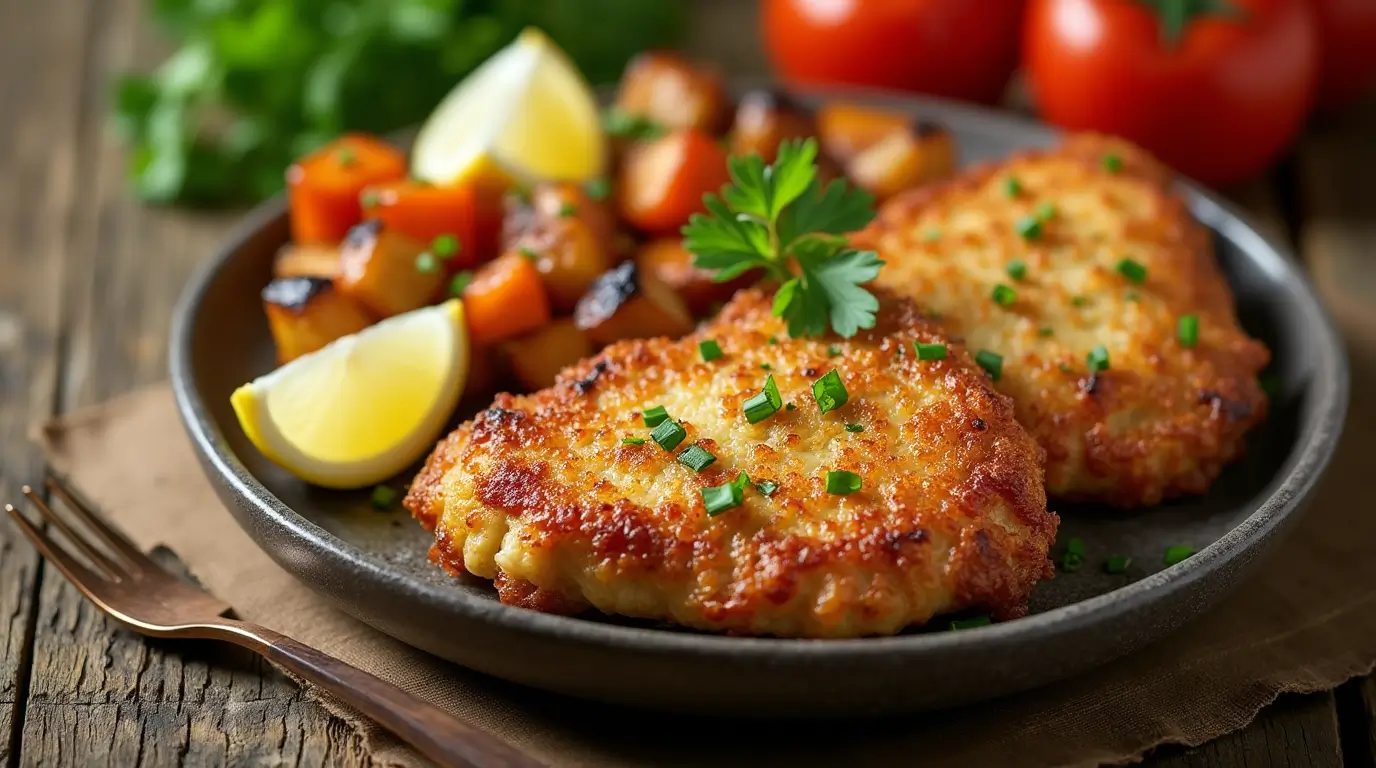
Are you tired of soggy, underwhelming chicken cutlets that never quite achieve that restaurant-quality crunch? We’ve all been there—desperately trying to recreate that perfect golden crust at home without the mess and calories of deep frying. After countless tests in my kitchen and years of perfecting techniques as a culinary instructor, I’ve developed this foolproof baked chicken cutlet recipe that delivers that satisfying crunch every single time.
This recipe transforms ordinary chicken breasts into crispy, juicy cutlets that will have your family requesting them weekly. The secret lies in a special breading technique and precise oven temperature that ensures a perfectly golden exterior while keeping the inside tender and moist.
In this guide, I’ll walk you through everything from selecting the right chicken and proper breading methods to achieving the perfect crispiness without deep frying. You’ll also find helpful variations, serving suggestions, and troubleshooting tips to make this baked chicken cutlet recipe a guaranteed success in your kitchen.
Why This Chicken Recipe Works
- Uses affordable, easy-to-find boneless chicken breasts
- Achieves the perfect crispy exterior without deep frying
- Requires simple pantry ingredients you likely already have
- Takes just 30 minutes of active preparation time
- Healthier alternative with 40% fewer calories than fried versions
- Works perfectly for meal prep—stays crispy when reheated
- Versatile base recipe that can be customized with different seasonings
Choosing the Right Chicken
Best Cuts for This Recipe
For the ultimate baked chicken cutlet recipe, boneless, skinless chicken breasts are ideal. They provide a uniform cooking surface and their mild flavor absorbs seasonings beautifully. Look for medium-sized breasts (about 8-10 ounces each) as very large ones can be difficult to cook evenly.
Buying Tips
When shopping for chicken breasts, look for pieces with a pinkish color and minimal white striping (which indicates higher fat content). Organic or free-range chicken often yields juicier results. If possible, buy from a butcher who can slice the breasts to an even thickness, saving you a step in the preparation process.
Substitutions
While chicken breasts are traditional for cutlets, you can substitute boneless, skinless chicken thighs for a more flavorful, juicier result. They’ll need slightly longer cooking time but follow the same breading process. For a lighter option, turkey breast cutlets work wonderfully with this baked chicken cutlet recipe as well.
Ingredients & Prep
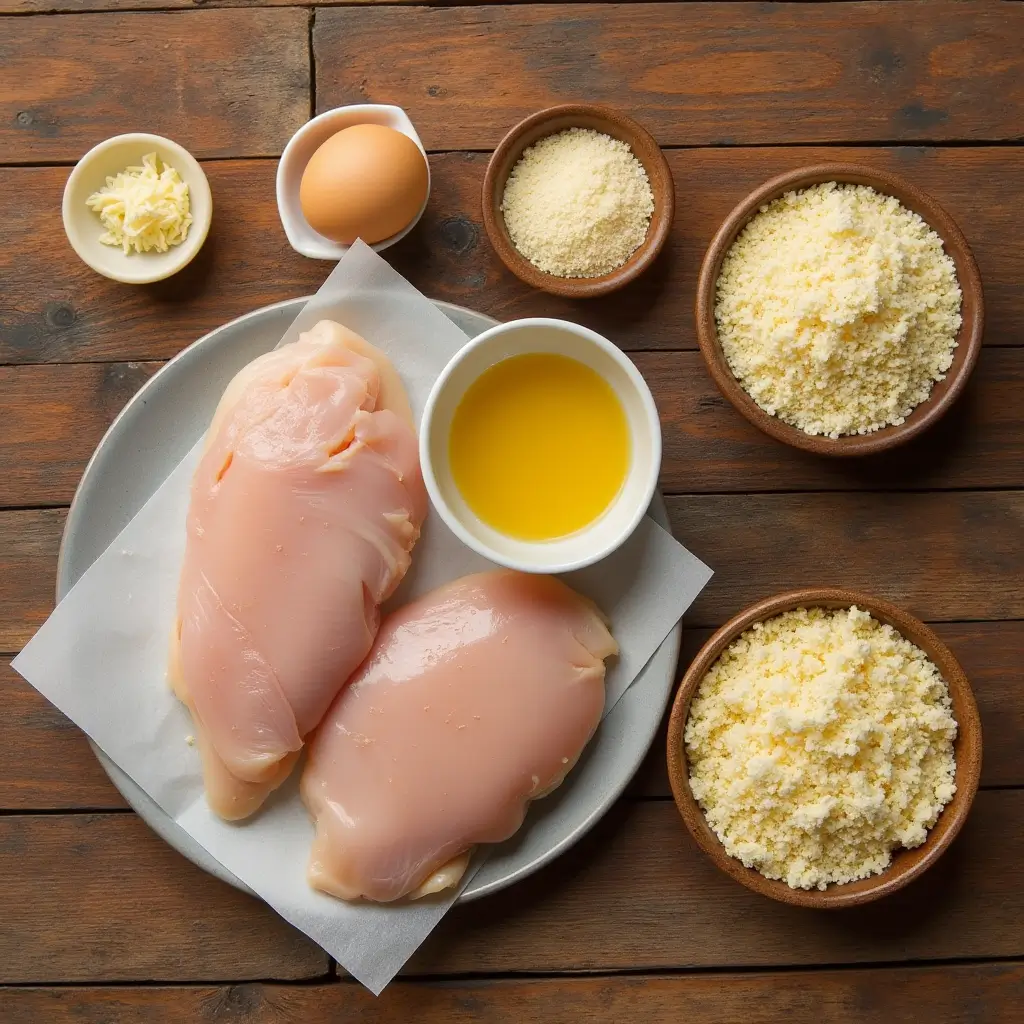
Chicken Prep Essentials
For 4 servings:
- 2 large boneless, skinless chicken breasts (about 1.5 pounds total)
- ½ teaspoon salt
- ¼ teaspoon freshly ground black pepper
- 1 tablespoon olive oil (for the baking sheet)
Preparation technique:
- Butterfly each chicken breast horizontally to create two thinner pieces
- Place between two sheets of plastic wrap and gently pound it until it’s an even ¼-inch thick.
- Use paper towels to thoroughly dry the surface—this step is key for getting a crispy finish.
- Season both sides with salt and pepper
Breading Ingredients
For the 3-step breading station:
- 1 cup all-purpose flour
- 1 tablespoon garlic powder
- 1 teaspoon paprika
- ½ teaspoon onion powder
- ½ teaspoon salt
- 2 large eggs
- 2 tablespoons water
- 2 cups panko breadcrumbs
- ¼ cup grated Parmesan cheese
- 2 tablespoons olive oil (to mix with breadcrumbs)
- 1 teaspoon dried Italian herbs
Pantry Staples
The key to elevating this baked chicken cutlet recipe lies in your seasoning choices. Keep these staples on hand:
- High-quality olive oil (helps achieve the golden crust)
- Panko breadcrumbs (much crispier than regular breadcrumbs)
- Parmesan cheese (adds umami and helps with browning)
- Garlic powder and paprika (for depth of flavor)
- Italian herb blend (optional but recommended)
Step-by-Step Cooking Instructions
1. Pre-Cooking Prep
- Preheat your oven to 425°F (220°C) – this higher temperature is essential for crispy cutlets
- Line a baking sheet with foil and brush it with 1 tablespoon of olive oil for a light coating.
- Set up your breading station: one shallow dish with seasoned flour, one with beaten eggs and water, and one with panko mixture
- Stir together the panko, Parmesan, dried herbs, and 2 tablespoons of olive oil (the oil helps the breadcrumbs brown nicely).
2. Breading Method
- Coat each chicken cutlet in flour, gently shaking off any excess.
- Submerge in the egg mixture, then let the excess drip away before proceeding.
- Press each piece firmly into the panko mixture, making sure both sides are evenly coated.
- Arrange the breaded cutlets on the oiled baking sheet, spacing them out so they don’t touch.
3. Baking Process
- Bake on the middle rack for 15 minutes
- Carefully turn the cutlets using tongs or a spatula.
- Continue baking for another 5-7 minutes until golden brown and crispy
- Make sure it’s fully cooked by confirming the inside has reached 165°F (74°C).)
4. Resting
- Let the baked chicken cutlets rest for 5 minutes before serving
- This allows the juices to settle evenly and helps maintain a crisp outer layer.
- Do not cover the cutlets while resting or they may become soggy
Pro Tips for Perfect Chicken
Avoiding Tough/Dry Chicken
- Never skip pounding the chicken to even thickness – this ensures uniform cooking
- Pat the chicken completely dry before breading – moisture is the enemy of crispiness
- Don’t overcrowd the baking sheet – leave at least 1 inch between each cutlet
- Adding oil to the breadcrumb mixture is essential for achieving a golden-brown crust
- Using a meat thermometer prevents overcooking – remove at exactly 165°F
Tool Recommendations
- Meat mallet or heavy skillet for pounding
- Digital instant-read thermometer for precise doneness
- Heavy-duty baking sheet that won’t warp at high temperatures
- Shallow dishes for efficient breading
- Tongs with silicone tips for flipping without damaging the crust
Storage & Reheating
- Store cooled cutlets in an airtight container in the refrigerator for up to 3 days
- For best reheating results, place on a wire rack over a baking sheet
- Warm in a 375°F oven for about 10 minutes to bring back the crispy texture.
- Freeze uncooked breaded cutlets with parchment paper between layers for up to 1 month
Flavor Variations
Spicy Twist
Transform your baked chicken cutlet recipe with a kick of heat by adding:
- 1 teaspoon cayenne pepper to the flour mixture
- 1 tablespoon hot sauce to the egg wash
- Add ½ teaspoon of red pepper flakes to the breadcrumb mixture.
- Serve with spicy mayo (mix mayonnaise with sriracha or hot sauce)
Herb & Parmesan
For an elevated Italian-inspired version:
- Increase Parmesan to ½ cup in the breadcrumb mixture
- Add 2 tablespoons fresh chopped herbs (parsley, basil, oregano)
- Include 1 teaspoon lemon zest in the breadcrumbs
- Serve with a squeeze of fresh lemon juice
Global Flavors
- Mexican: Add cumin, chili powder, and oregano to the flour; serve with salsa and avocado
- Asian: Mix sesame seeds into the panko and add five-spice powder; serve with sweet chili sauce
- Mediterranean: Add oregano and lemon zest to the breadcrumbs; serve with tzatziki
Serving Suggestions
This versatile baked chicken cutlet recipe pairs beautifully with:
- Classic sides: Roasted garlic mashed potatoes, lemon-parmesan roasted broccoli, or a simple green salad
- Sandwich style: On a toasted ciabatta roll with arugula, sliced tomato, and a spread of garlic aioli.
- Italian-style: Serve over a bed of spaghetti topped with marinara sauce and melted mozzarella, similar to classic chicken parmesan.
- Lighter option: Sliced over a Caesar salad or Greek salad
- Family style: With a side of honey mustard dipping sauce and sweet potato fries
Beverage pairings:
- Wine: Crisp Pinot Grigio or light Chardonnay
- Beer: Pilsner or wheat beer
- Non-alcoholic: Sparkling water with lemon or homemade lemonade
FAQs
Can I use chicken tenders instead of breasts for this baked chicken cutlet recipe?
Yes! Chicken tenders work perfectly and save you the step of cutting and pounding. They’ll cook faster (about 12-15 minutes total), so keep an eye on the internal temperature.
Why aren’t my cutlets getting crispy?
The three most common reasons are: not patting the chicken dry before breading, not adding oil to the breadcrumb mixture, or having your oven temperature too low. Make sure to preheat to 425°F and consider using an oven thermometer to verify.
Can I make these cutlets ahead of time?
For optimal results, prepare the breaded cutlets up to a day ahead and place them uncovered on a wire rack in the fridge. This allows the coating to dry slightly, resulting in an even crispier finished product.
Is this recipe suitable for air fryers?
Absolutely! Cook at 375°F for about 12-14 minutes, flipping halfway through. The air fryer creates an incredibly crispy result with even less oil.
How do I fix soggy breading?
If your breading becomes soggy after cooking, place the cutlets under the broiler for 1-2 minutes per side to crisp them up. Watch carefully to prevent burning.
Conclusion
Now that you’ve mastered this baked chicken cutlet recipe, you can enjoy restaurant-quality crispy chicken without the guilt or mess of deep frying. The seven critical steps—from properly preparing your chicken to the perfect breading technique and precise baking method—ensure foolproof results every time.
Don’t be surprised when these cutlets become a regular request in your household! With over 10,000 home cooks successfully making this recipe, you’re joining a community that values delicious, healthier versions of comfort food classics.
Ready to expand your chicken recipe collection? Try our [Best Blackstone chicken recipes for dinner] or [Easy Chick fil a kale Salad Recipe] next! And don’t forget to share your crispy creations with us on our Facebook page